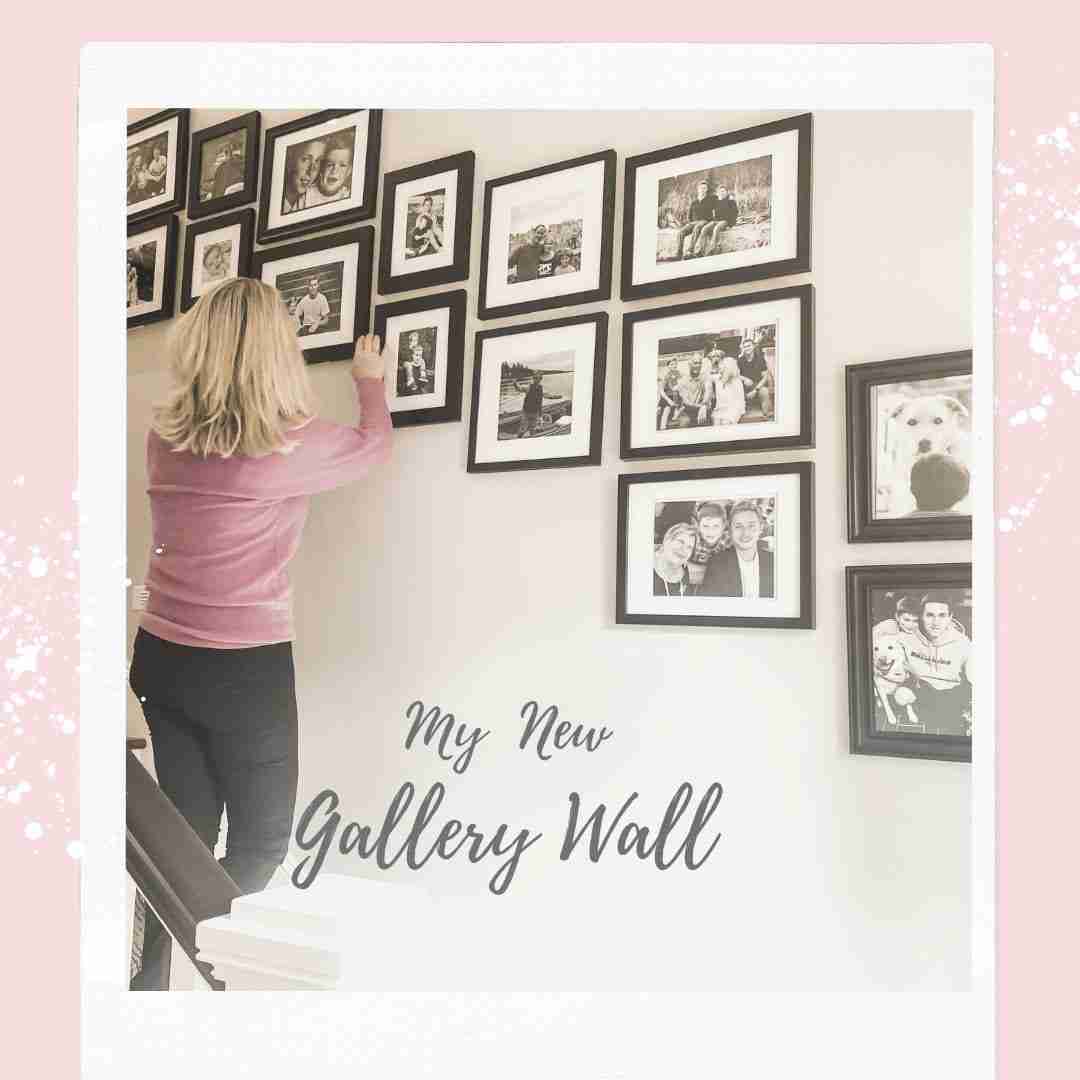
4 Easy Steps To Arrange A Family Photo Gallery Styled Wall
Gallery-styled photo walls are extremely popular as they add character and a personal touch and personality to hallways, bedrooms, dining rooms and staircases. In this post I share four DIY easy steps to arrange a family photo gallery styled wall.
I have always wanted an expansive family photo gallery where any family member passing by would get a warm sense of gratitude and love just by glancing at the framed pictures- the moments in time.
I recently finished a gallery memory collage of photos (gallery style wall) and I wanted to share the step by step tutorial because trying to layout the design with so many different size frames can be very overwhelming when you are shooting for a cohesive look.
If I can do this, so can you. You don’t need to hire a interior designer, you got this!
How To Plan And Arrange A Family Photo Gallery Wall
My DIY Family Photo Wall Project
After our Hampton styled home renovation was complete, my hubby was not thrilled about drilling any holes into our perfectly smooth drywall. I finally convinced him that I wanted to display our family photos in a classy and organized manner with black frames. He agreed.
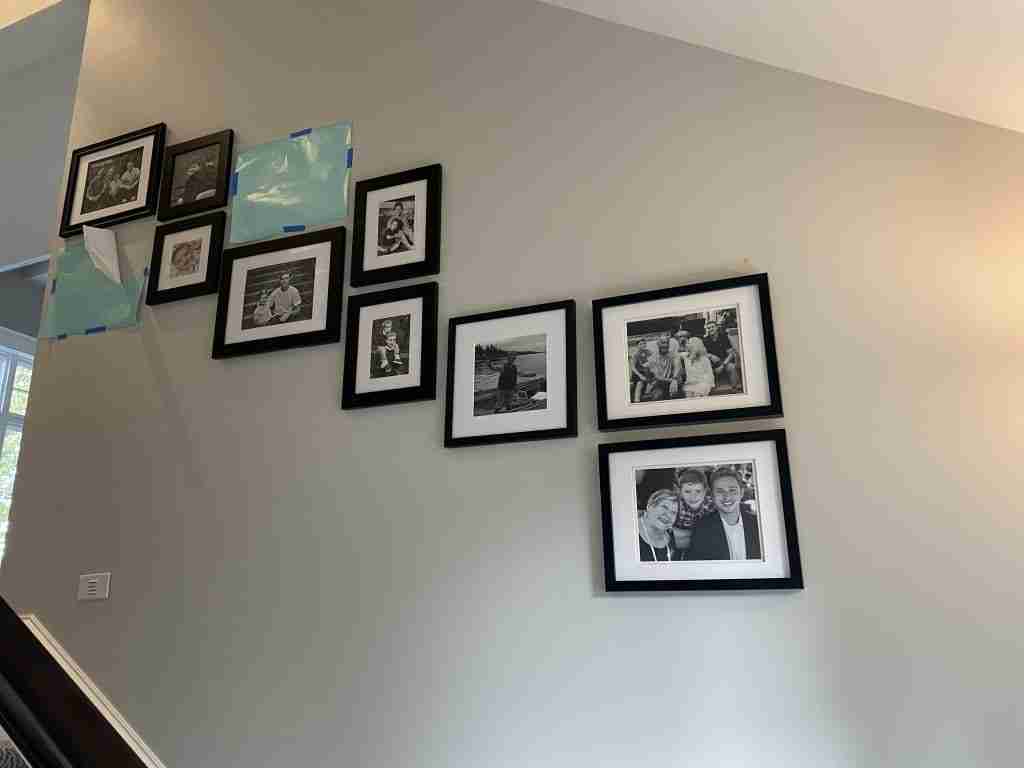
I decided that our back staircase was ideal for my photo gallery project—a high-traffic area for our family. A stair-stepped layout was a little intimidating I must admit.
The project took me a lot longer than I expected because I didn’t want to make too many holes in the wall. I also dragged my feet, deciding which photos I wanted to use and the ones which the family would approve. I am so glad I took the time to carefully layout the gallery style wall so the whole family could enjoy it for years to come.
Don’t let this stop you. Just start the project and do one step at a time.
The entire family is thrilled with the wall of love, as I call it. When I am having a bad day, all I have to do is walk upstairs and reflect on the fond memories, it’s life changing!
Side note…. I struggled with infertility for over ten years so my heart melts with joy reflecting on my two miracle babies that have grown so fast.
The following is the steps I took to plan my family photo gallery wall, I hope you helps you find inspiration. Remember that everyone has their own personal style so pick the style that is best for you and your home.
So, how do you plan and style a family photo gallery wall?
1. Make A Plan-
a. Theme & Wall Design
What theme do you want to go with? Do you want to display travel photos or family portraits? Black and white images, color photos and or art pieces.
How do you want the gallery wall to make you feel? It’s so hard to get an idea from staring at a blank wall but you will get there. Do you have one photo you want to be the focal point?
Decided on the photo wall design, here are some ideas:
- Grid Design
Grids result in a clean, crisp, formal arrangement. This is a fun way to arrange your art or photos in frames that would replace a large piece of art.
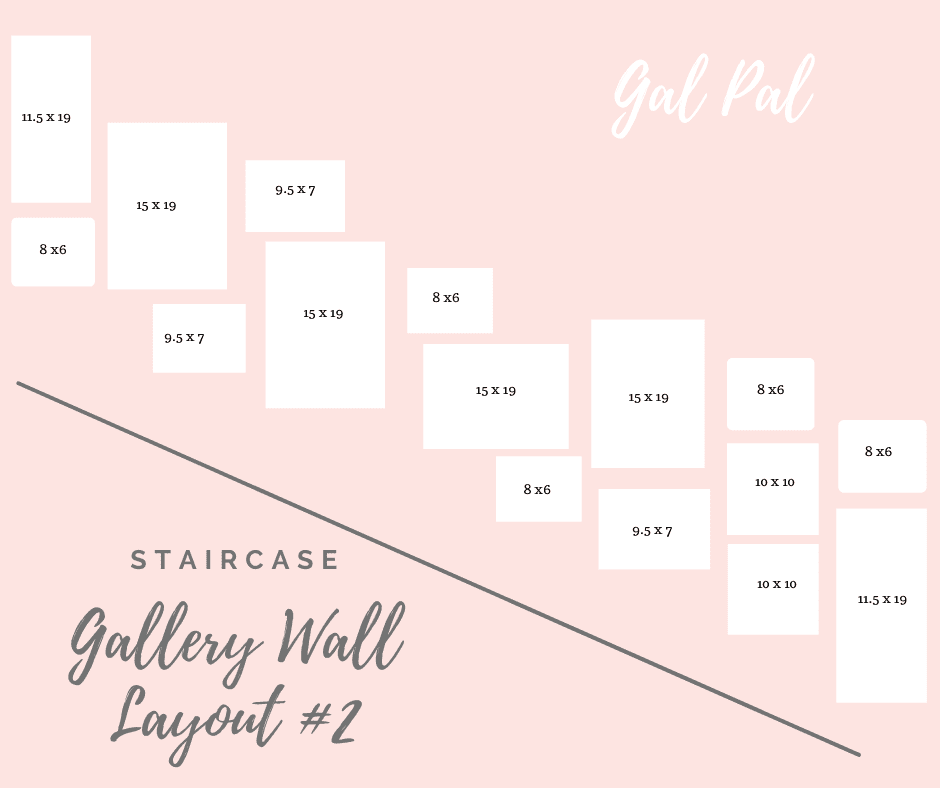
- Stair-step Layout
- Bottom aligned or Top aligned (when the frames align in a straight line.
- Monochromatic- black and white as example

B. Eye Level
When you’re starting to plan your gallery wall, think from the center.
At eye level. Think about where you’d usually be viewing the wall from. Is it a small room? Aim for about 60 inches from the floor to the center of your gallery wall. This all depends on the size of the room and wall.
In a larger room with a tall ceiling, take advantage of the extra room—you’ll be viewing the wall from farther away, pushing eye level higher.
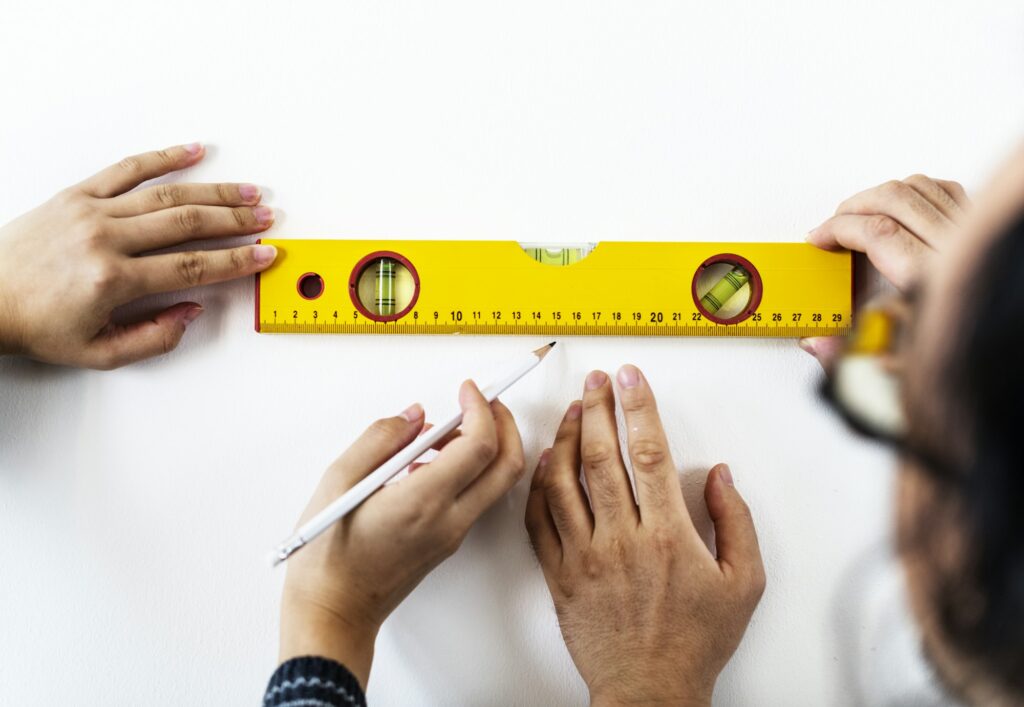
B. Use Your Tape Measure
Get out the measuring tape and measure the wall. How big is the wall you want to use? Try to use uniform spacing to provide a cohesive feel to your design.
A consistent measurement — How many inches between the frames? two inches between frames, for example — works well for a grid installation, but for a salon wall, you can be less precise.
C. Wall Mock-up
Some wall frames now come with paper cut-out mock-ups which are really handy. This way , you can tape them on the wall and create your wall design. You can decide if you want a symmetrical gallery wall or something different.
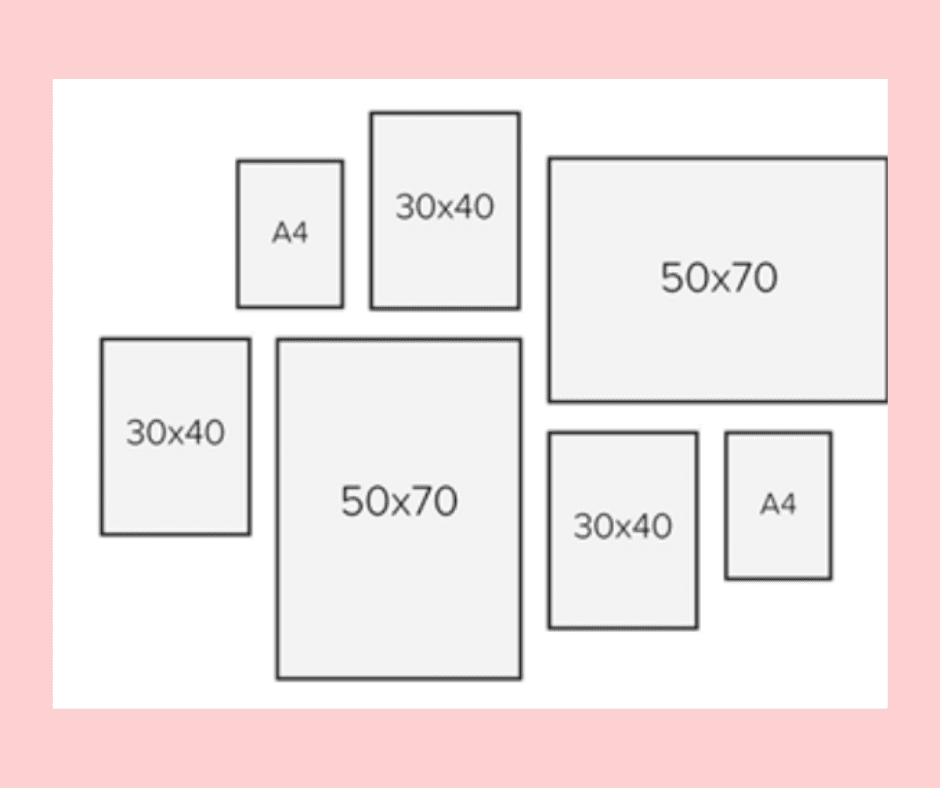
To keep your gallery wall interesting, you’re going to want to have the right mix of vertical and horizontal pieces. If your most considerable details are horizontal, try placing a smaller vertical piece next to it (centered or bottom aligned) and vice versa. It’s an excellent way to start moving inwards from your larger pieces.
The layout in process. One picture frame at a time.
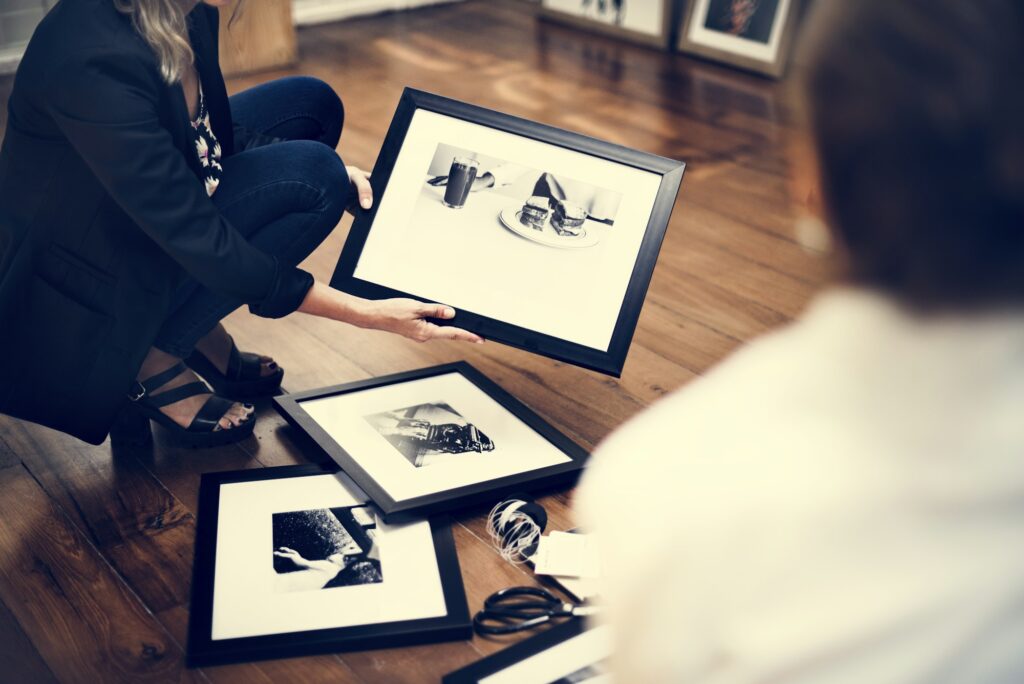
Use The Floor To Layout Your Frames And Design Ideas.
Arrange your collection within the outline on the floor, moving pieces around until you find a balanced composition. Keep in mind that you usually want to use the largest frames in the middle to keep the design balanced.
Once you’ve got your “floor layout” figured out, grab your phone so you can take a picture of your design and use it for reference.
The Big Picture
Every so often, take a few steps back and view your wall from another area in the room. Pay attention to how the color and size of the pieces and the color of the wall so they balance each other out. Use painting tape to tape the paper mockups to the wall.

2. Frame Consideration
I wanted to go with black and white photos, so I decided to go with all black frames. For my project, I wanted to mix and match my frames to add texture and interest.
Do you want to use metallics, stained woods or white frames? Colored frames tend to be distractive and take away from the actual photos. If you keep your frames in the same color tone, the wall will look more visually appealing and clean.
After you consider the color of frames:
- Decide on what kind of frames. Going for a modern look or classic?
- Don’t shy away from mix and match your frames. The frame width can vary; try to keep the style of frames somewhat consistent.
- For instance, consider either modern, clean lines or country.
Country-style frames tend to be wood and have thick frames. Modern art galleries favor super slim frames for works-behind-glass. I went with a transitional type of frame that would go in most homes.
You may want to consider the weight of the frames. I did not want to hang heavy frames because I was determined to use command stripes on the smaller frames to avoid pounding holes in the walls.
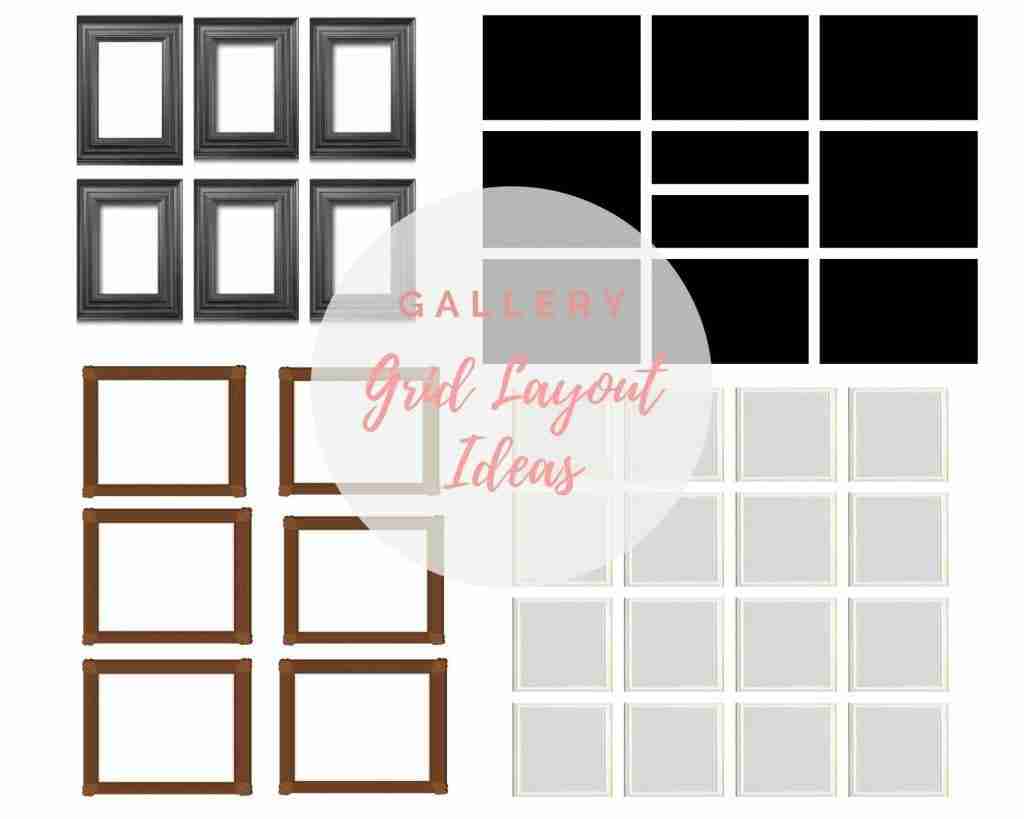
Another Photo Layout Grid To Consider
3. How About Matting?
I like work that is framed and matted, but I also am happy with just frames. On my gallery wall, I used both framed and unframed photos. It looks great to mix things up here.
When I do go with matting, I go with pure white or linen. It depends on the print and the room, but either works very nicely. White shows off work 100%, linen adds texture and warmth.
4. Hanging The Frames
For photo gallery walls, most likely the frames will most likely be (under 10 pounds): Use one standard nail or picture hanging hook.
- For medium-sized prints: Use two nails or hooks for a more secure hold.
- For large prints or heavy frames: Use an anchor if it’s going into drywall with no stud.
Hang the frame. Measure the same distance from the center of your pencil reference line down. Mark the spot with your pencil–that’s where you’ll install your fastener. If you’re not using a wall anchor, affix an adhesive hook or hammer in a nail.
Hanging a picture without nails is now very possible for smaller and lighter frames.
- Use adhesive strips and utility hooks designed to hold the size of your frame.
- Clean the surface of your wall with a 1:1 solution of water and rubbing alcohol.
- Remove the back liner from the adhesive strip, and apply it directly to the wall where you want to hang your picture.
- Remove the front liner from the strip and firmly press the utility hook against the surface. Hold it steady and in place for 30- to 40-seconds.
- Once it’s secure, hang your picture on the hook
Here are some of the most frequently asked questions about arranging a photo wall:
- How do I choose a theme or style for my photo wall?
- Decide on a theme, such as family photos, travel memories, life celebrations or a mix of art prints and photos. Consider the overall style of your home and choose frames and photos that complement it.
- What is the best way to plan the layout?
- Lay out the frames on the floor first to experiment with different arrangements. You can also use paper templates cut to the size of your frames and tape them to the wall to visualize the layout.
- How do I decide on the spacing between frames?
- A consistent spacing of 2-3 inches between frames is common, but you can adjust based on your wall size and personal preference.
- What tools do I need to hang a photo wall?
- Basic tools include a tape measure, level, pencil, hammer, nails or picture hangers, and wall anchors if needed. A laser level can also be helpful for aligning frames.